
Ryobi is one of the most popular tool brands in the country, and for good reason. They offer a wide range of tools to meet the needs of DIY enthusiasts and value-minded Pros alike. If you’re new to Ryobi drills, you may be wondering what all of the settings on your tool are and how to use them. Fret not! We’re here to help.
Still looking for the right Ryobi drill? Check out our Best Ryobi Drill Reviews list to help you decide!
What Do the Numbers Mean?
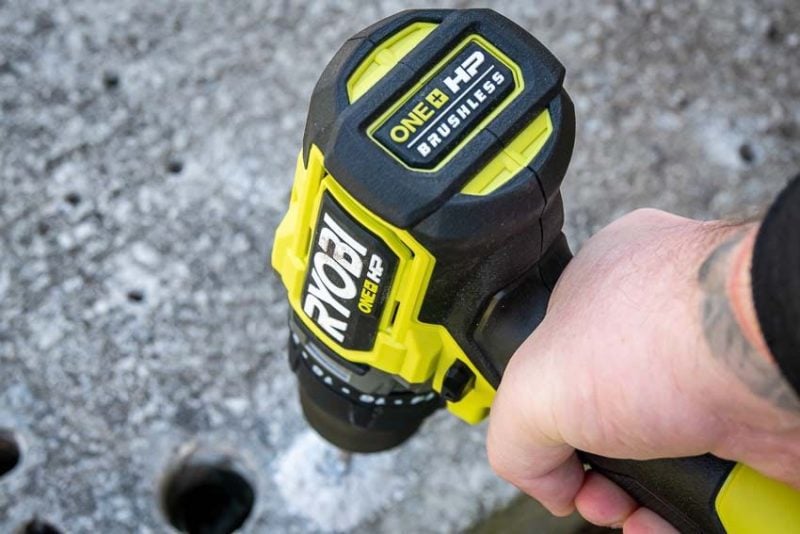
To help you understand what everything on your Ryobi drill means, we need a model to use as an example. I’m going with the current flagship model from the 18V One+ system, the Ryobi HP Brushless PBLHM102. However, you can apply these concepts to other drills in the lineup or even other brands.
This model is a hammer drill, which means it adds an additional hammering mechanism to help you drill in concrete. Don’t worry, everything else is the same as what you’ll find on your standard drill!
Learn more about the difference between a drill and a hammer drill.
The two basic performance specifications on a standard drill are speed and torque, and a hammer drill adds hammer rate to those. Here’s a quick look at this model’s specifications:
- No-Load Speed: 0 – 700 / 0 – 2150 RPM
- Maximum Torque: 850 in-lbs
- Hammer Rate (or blow rate): 34,400 BPM
Speed
No load speed measures how fast the drill’s chuck spins when you pull the trigger without actually drilling into anything. The PBLHM102 has two gears, so there are two speed ranges.
Both speed ranges start at 0 because, like many cordless drills, this one has a variable speed trigger. If you pull the trigger just slightly, it will run at a slow speed, and then increase in speed the more the trigger is pulled.
Once you start drilling and driving into wood, metal, concrete, or other materials, the drill will slow down because the load makes it harder to maintain the speed.
Torque
Torque is a measure of how much rotational power a tool has. The higher the number, the more force it can apply. If you’re working with small drill bits, it doesn’t take much torque to help them drill. However, when you start using larger bits, like spade bits, self-feed bits, and auger bits, you need more torque to keep them turning.
Hammer Rate
Hammer rate, also known as blow rate, only applies to hammer drills, not standard drill drivers. In hammer drills, there’s an additional mechanism between the chuck and the motor that creates a forward/backward chipping action. This function helps you drill more effectively into concrete and masonry.
The hammer rate measures how many times that action happens in a minute. In the PBLHM102’s case, the blow rate is 34,400 BPM (Blows Per Minute). And yes, it’s crazy high!
How to Switch Gears on a Ryobi Drill
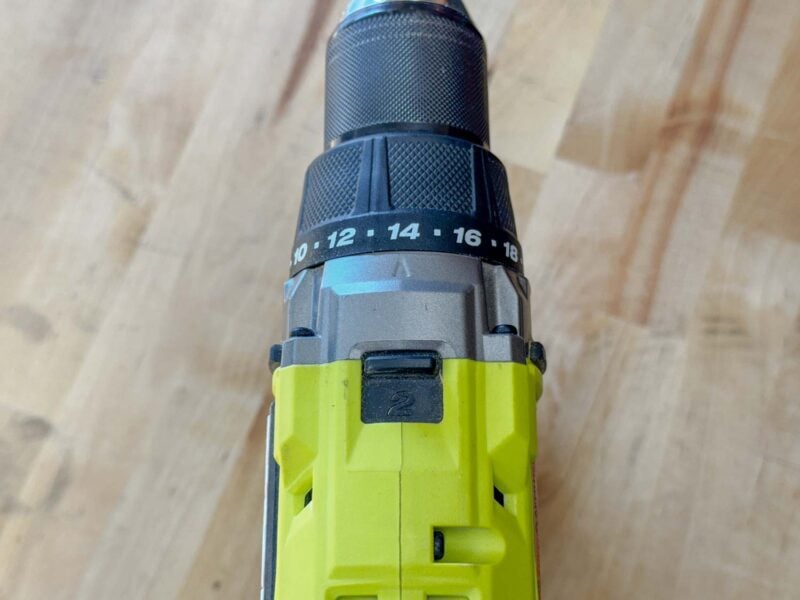
A drill’s gearing creates an inverse relationship between speed and torque, but it’s much less complicated than you may think. To put it simply, low gear provides lower speed and higher torque, and high gear delivers higher speed and lower torque.
For our example drill, to get the maximum torque of 850 in-lbs, we have to be in low gear, which tops out at 700 RPM.
Most of the time, you’ll drill using the high-speed gear. If your bit binds up and stalls the motor, that’s your signal to switch to the low-speed gear. Of course, if you know you need high torque, you can always start in low gear.
Changing to your desired gear is a matter of flipping the switch on the top of the drill. On Ryobi drills, low gear is marked with a 1, and high gear is marked with a 2.
How to Switch Between Forward and Reverse Drilling
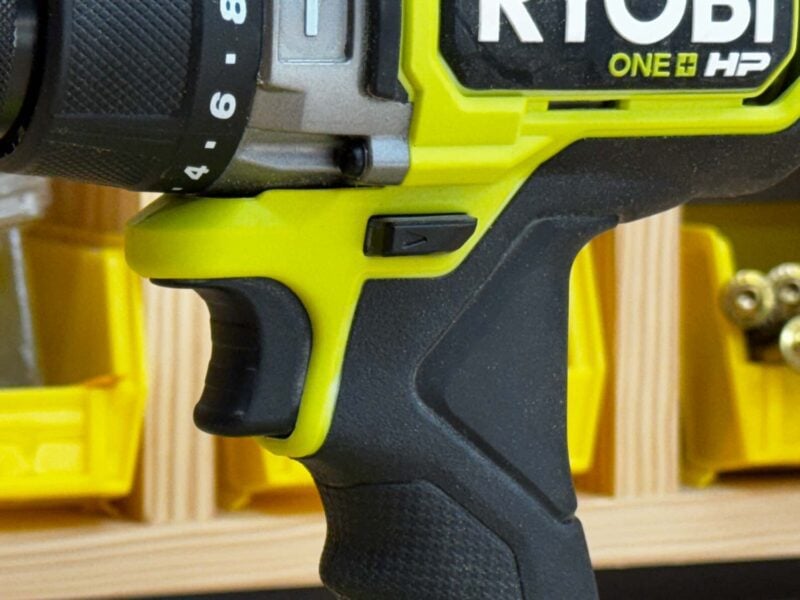
At the top of the handle and behind the trigger, there’s a switch that changes your drill’s rotation between forward and reverse. While it may seem like the switch is hidden a bit, the position is intentional, allowing you to switch directions with your thumb and forefinger without having to take your hand off the drill.
Looking closely, you’ll notice direction arrows on each side to let you know which direction it’s set to. Push the left side in for forward drilling and push the right side in for reverse. To lock out the trigger and prevent the motor from activating in your tool bag, position the switch in the center.
Still working on the basics? Check out our guide on how to change drill bits.
How to Change Drilling Modes
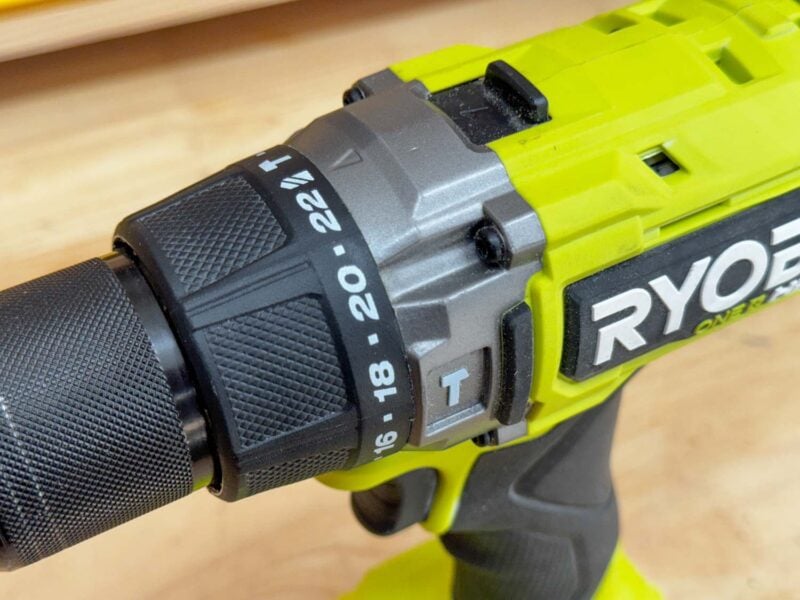
Most modern drills have two modes—drilling and driving. Hammer drills have both of those modes, plus a hammering mode, as we talked about above, for a total of three modes.
There are two primary styles of mode changes on drills. Our Ryobi HP Brushless PBLHM102 has all of the settings on a collar behind the chuck. Changing modes is as simple as twisting the collar to the mode or clutch setting you want to work in.
Other drills use a combination of a switch on the side and a collar. For those, the mode changes are on the switch, and the clutch settings are on the collar. Less commonly, you can find drills that have two collars to separate the mode and clutch settings. Functionally, they create the same results, though.
Each mode uses a symbol, and luckily, they tend to be the same no matter which brand you’re using. A hammer icon indicates hammer drill mode, a drill icon indicates drilling mode, and a screw icon indicates driving mode. Remember, if you’re using a standard drill, you won’t see the hammer icon.
How to Use the Clutch Settings
The clutch settings on your Ryobi drill only apply in driving mode, and they allow you to adjust how much torque you apply as you’re driving screws. The numbers on the clutch indicate different levels of torque, but not the actual amount of torque. As you’d expect, the lowest clutch setting number applies the lowest torque, and vice versa.
The purpose of different clutch settings is to help you avoid overdriving screws and damaging the material you’re working with. If you start low, you can always move your clutch setting higher if you need more torque.
For driving into soft or thin wood, working with small screws, or setting Tapcons into concrete, twist the collar to a low clutch setting. If it’s not driving far enough, twist to a higher setting until you find the right one.
If you’re working with larger screws or harder materials, you’ll find you need more torque.
Explore more about how to use clutch settings on your drill.
Have any questions about your Ryobi drill that we didn’t cover? Ask away in the comments below!
