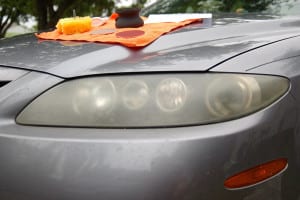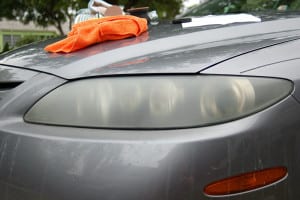
Fogged over headlight covers. We just didn’t have this problem when our headlight covers were actually made of glass. Still, polycarbonate lens covers are easy to mold and tough to break, so now it dominates the market. Unfortunately, it is susceptible to oxidation which leaves us in need of headlight restoration. While there are a variety of sources of damage to those polycarbonate covers on the road, the biggest culprit is ultraviolet light from the sun. UV light leaves micro cracks in the cover which increases the surface area that is able to be oxidized. As oxidation takes place, the headlight cover begins to turn yellow and become cloudy. It’s your car’s version of developing cataracts.
Fortunately, the fix is much easier than eye surgery. While it may look a little intimidating on the surface, it’s actually really easy and there are several quality products on the market to help you do it yourself.
Headlight Restoration: What You’ll Need
- Headlight Restoration Kit
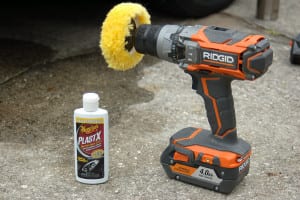
- Standard Corded or Cordless Drill
- Water
That’s it! The only tool you need is a drill, and even a Harbor Freight special will work. Hmm… I think this might be the first time I’ve ever said that a Harbor Freight special is actually a reasonable tool for the job. I went with my Ridgid Gen5X Hammer Drill (in drill mode) and only used 1 bar on the HypterLithium battery.
Choosing a Headlight Restoration Kit
Go for an all inclusive headlight restoration kit. I picked up a Meguire’s Heavy Duty Headlight Restoration Kit from Wal-Mart for about $24. Contributing writer, Adam Spafford used a $35 kit from 3M. Both did an excellent job and share common characteristics. Whichever kit you decide to go with should include the following:
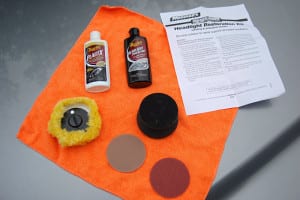
- Course grit sandpaper
- Fine grit sandpaper
- Headlight cover polish
- Headlight cover protectant
- Microfiber towel
- Polish applicator
Some kits will include more. The 3M kit also had making tape to protect the paint while you’re working and a sandpaper attachment for your drill. The sanding can be done by hand (as with the Meguire kit), but being able to use the drill will save you some sweat.
The Process
Step 1: Prepare
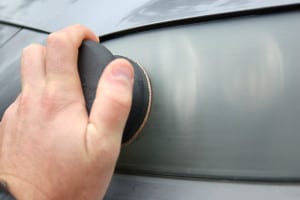
Headlight restoration begins by intentionally damaging the the lens cover surface. The UV rays created micro cracks in your cover, so we’re going to first sand those down. If your kit came with masking tape, you’ll want to make sure that the painted surfaces around the cover are completely covered. A sanding disk with a drill will make quick work of any clear coat and paint that it accidentally comes in contact with. If you’re hand sanding, you can get away without taping, but you’ll still want to be careful.
This is a wet sanding process, so you’re going to create a slurry as you go. Also, the sandpaper is creating fine scratches in the lens cover which will fog over as it dries. It looks horrible, but don’t panic! It’s supposed to do that. With the course grit sandpaper (1000 grit), sand horizontally across the light. You’ll need to adjust in the corners, of course. With the fine grit (3000 grit) sandpaper, sand in a vertical pattern. This combination of horizontal and vertical sanding will create the optimum surface for the polish. Be sure to keep the sandpaper or lens wet throughout the sanding process.
Step 2: Polish
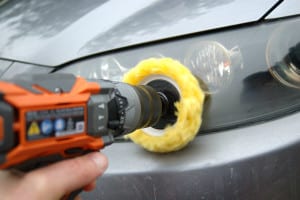
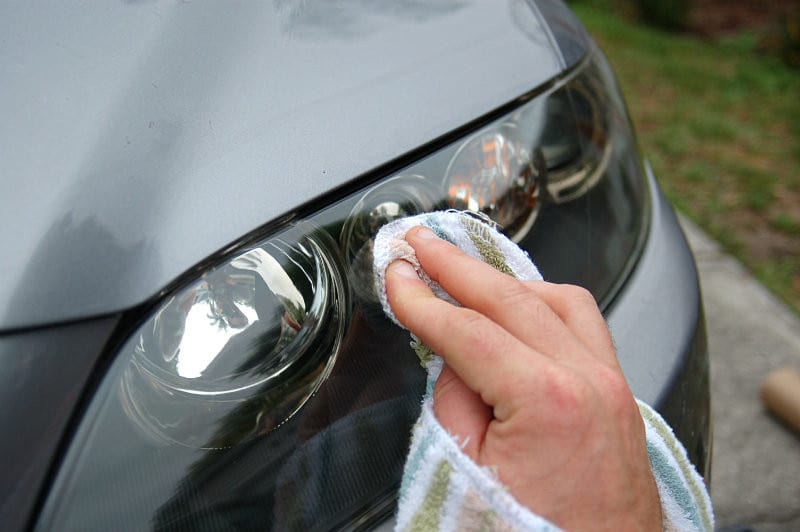
If you didn’t use a drill in the first step, you’ll use it here. Wipe the headlights dry with the microfiber cloth (or towel if you need to). Apply a nickel to quarter sized amount of polish on the applicator after you’ve installed in on your drill. The applicator will absorb some of the polish, but putting too much on will result in it splattering everywhere.
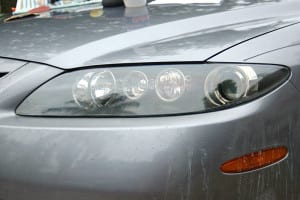
Pressure doesn’t matter nearly as much as plenty of rotations with the drill so even a 12V cordless model will be fine. If you’re using a multi-speed drill, you may want to opt for the slower speed to maintain control. The drill is moving the polish around and filling all of those micro abrasions in the lens that you created with the sandpaper. Be sure to wipe off the polish before it has a chance to dry. The cover should now be as shiny and clear as a brand new one. If you missed any spots, it will be obvious. It will still look fogged over when it dries. Should that happen, just apply some polish where you missed.
Step 3: Protect

Your headlight restoration kit should have come with a UV protectant. This works the same way that wax does on the painted surfaces to protect your car from UV rays. With a terry cloth or micro fiber towel, dab some UV protectant on and wipe it onto the headlight using a swirling motion. Be sure to get every part of the headlight covers. Simply wipe off the excess and dry it with the microfiber towel, and you’re done!
Final Thoughts
Some headlight restoration products out there are only a polish or UV protect. Those are great for maintaining a clear headlight cover, but terrible if you’re trying to reverse damage. You need to go through the sanding process to do that. If you’re looking at a kit that doesn’t include what you need for the sanding step, put it back and grab a different one. There are some snake oil fixes out there, but I have yet to see any of them work for longer than a couple of hours.
Kits will come with various amounts of the polish and protectant. The 3M headlight restoration kit included enough to do two sets of headlights. Meguire’s will likely do 6 – 8 sets. The sandpaper may not hold up that long, but you’ve got the chemicals to make it happen. It’s going to look like your car has been crying tears of joy when it can see again so plan on washing it once you’re done.
When it comes to the time investment, you’re looking a maybe 30 minutes. Once you’ve done it a couple of times, you will be able to amaze your friends at your incredible talents in about 15 minutes. Better yet, tell them that the process is extensive and normally costly, but that you’ll take care of them for $50. Use the kit you already have, buy a six pack of your favorite brew, and order the good pizza for dinner. Then pretend you worked all afternoon on it.